
Users can choose from a variety of editing programs to make their creative projects come true. Whether montage, logo design or newspaper layout: The software company Adobe alone offers numerous programs geared to specific applications. In this workshop, you will learn which program to use for which purpose and why. We will explain the three major differences between Adobe Photoshop, Illustrator and InDesign, the most commonly used graphic programs: The central question is: Which program should I use to create a print-ready artwork file with optimum processing capabilities for an online print shop?
Contents of this article:
- What are the advantages of Photoshop?
- What are the advantages of Illustrator?
- What are the advantages of InDesign?
- The problem: PDFs created in Photoshop and Illustrator
- The correct workflow
What are the advantages of Photoshop?
Photoshop is a professional tool for varied and complex photo editing tasks.
Main functions of Photoshop
Photoshop is used mainly to edit and manipulate photos and graphics. The software provides a broad range of corrective settings for colour, brightness, saturation, etc. Moreover, the tool is sufficiently flexible to create website layouts, for example. Graphic designers use Photoshop to add a specific mood to photos to create a certain impact on the observer. This includes working with different colour spaces. For example, photos taken with a digital camera (RGB mode) can be converted to CMYK mode to get them ready for printing.
The technical side
Photoshop is a pixel-based graphics editor. This means that the user can assign a specific brightness value to every single pixel within a working document. The higher the resolution, the smoother the representation. Basically, there are two resolutions which are commonly used internationally. 72 dpi (dots per inch) are generally used for web projects and 300 dpi for print applications. However, Photoshop also allows user-defined resolutions.
Photoshop file formats
.psd – the file format for Photoshop documents
.jpg – file format with losses, suitable for web
.png – lossless file format, suitable for web
.tiff – lossless file format, suitable for print
Additionally, there are numerous other file formats for further applications. This includes the PDF format. You will learn why you should not create PDF files intended for printing in Photoshop in section The problem: PDFs created in Photoshop and Illustrator.
What are the advantages of Illustrator?
Unlike Photoshop, Illustrator is capable of displaying, processing and creating vector graphics. This makes the tool popular especially for drawing applications. Combined with a graphics tablet, Illustrator allows creating impressive pictures.
Main functions of Illustrator
Illustrator is a vector-based graphics program. It is particularly well suited to create logos and scalable graphics. The vectorize function allows scaling images to any size without quality loss. Therefore, the actual resolution of a working document is secondary for the time being. Photoshop operates with brightness values of individual pixels, whereas Illustrator links to paths only. These paths are very flexible and can be manipulated in any way. Illustrator helps connecting and grouping paths to create new areas that can be coloured as desired.
The technical side
Illustrator does not operate with brightness values of individual pixels; its display depends on the screen resolution. The resolution of a monitor is much higher than that of a working document which ultimately assures the lossless display of graphics. Combined with a graphics tablet, Illustrator is a very powerful software program. The weight of a brush stroke, for instance, can be defined by increasing the pressure on the graphics tablet. Illustrator transfers the stylus pen movements directly to the screen.
Illustrator file formats
.ai – file format for Illustrator documents
.eps – lossless file format with path information
Illustrator additionally provides a function to save PDF documents. We advise against creating PDF files in Illustrator. The reasons why are described in section The problem: PDFs created in Photoshop and Illustrator.
What are the advantages of InDesign?
InDesign is a very powerful layout program and ideal to create print-ready artwork files. It is capable of merging all elements such as logo, text and pictures and preparing them for the printing process. InDesign displays and processes both pixel-based and vector-based graphics. The tool itself works on the basis of vectors which assures that fonts always appear sharp regardless of the font size.
Main functions of InDesign
InDesign is the interface between creating a layout and printing. You can assign colour profiles to the artwork files which are saved with the files. So a print-ready document created in InDesign contains all the information a print shop needs later on to put the desired design on paper or another substrate. The most important step when creating print-ready files also takes place here: exporting to PDF. A PDF file created in InDesign is the ideal artwork file format.
The technical side
InDesign can be considered a hybrid among graphics programs. It processes both pixel-based and vector-based graphics. A print document is always the starting point. InDesign does not necessarily provide the suitable toolbox for web applications. The export is only possible to a PDF file. Moreover, InDesign allows arranging multiple pages sequentially as in a book which greatly facilitates the layout process. The program also provides so-called masters where the user can predefine layouts and insert them as a standard template if necessary.
InDesign file formats
.indd – file format for InDesign documents
.idml – enables opening documents in earlier InDesign versions
.pdf – the ideal file format for artwork files
The problem: PDFs created in Illustrator and Photoshop
PDFs are different. Neither Illustrator nor Photoshop were originally designed for print applications. Therefore, PDF documents created in Illustrator and Photoshop still can cause problems when printed.
PDFs created in Photoshop
Regardless of the resolution, document size and colour settings, a PDF document can be created in Photoshop via File > Save as > Save as PDF. Always bear in mind that Photoshop is a pixel-based program. This can create an ugly jagged effect especially with low-resolution objects. This is particularly evident in fonts, but may also affect other elements such as shapes, lines, etc.
PDFs created in Illustrator
Illustrator also allows exporting PDF files. The program is vector-based so that both text and graphics appear razor sharp. This is not necessarily bad and may even be useful in some cases, for example if you created a logo and want to send it as a PDF file for viewing. But Illustrator, in our opinion, is not the best choice for print applications, especially in designs where large texts are being used. Instead, import vector files in InDesign and create your printable PDF there.
Conclusion: PDFs are different
Illustrator and Photoshop export PDF files in a different way than InDesign. Therefore, PDF files created with these two programs are not suitable for print applications.
This is where InDesign comes into play: InDesign integrates all file formats that can be exported from Photoshop and Illustrator and consolidates them to a print-ready artwork file. Only InDesign PDF documents deliver all the information needed to produce a successful print result.
What to do if only Photoshop is available?
Export your file as TIFF not as PDF. By doing so, you are on the safe side. However, please remember to flatten everything to one background layer and choose lossless LZW compression when exporting the file.
JPG files exported with maximum quality can be printed as well. The option to “flatten to one background layer” is not available since this file format does not allow any layers.
The correct workflow
So what is the correct workflow from working files to the print-ready document? To illustrate this process, we will combine a landscape photo with a logo to create a postcard and prepare it for printing.
3 steps to create optimum artwork files:
- Photo editing in Photoshop
- Logo design in Illustrator
- Print-ready files in InDesign
1) Photo editing in Photoshop
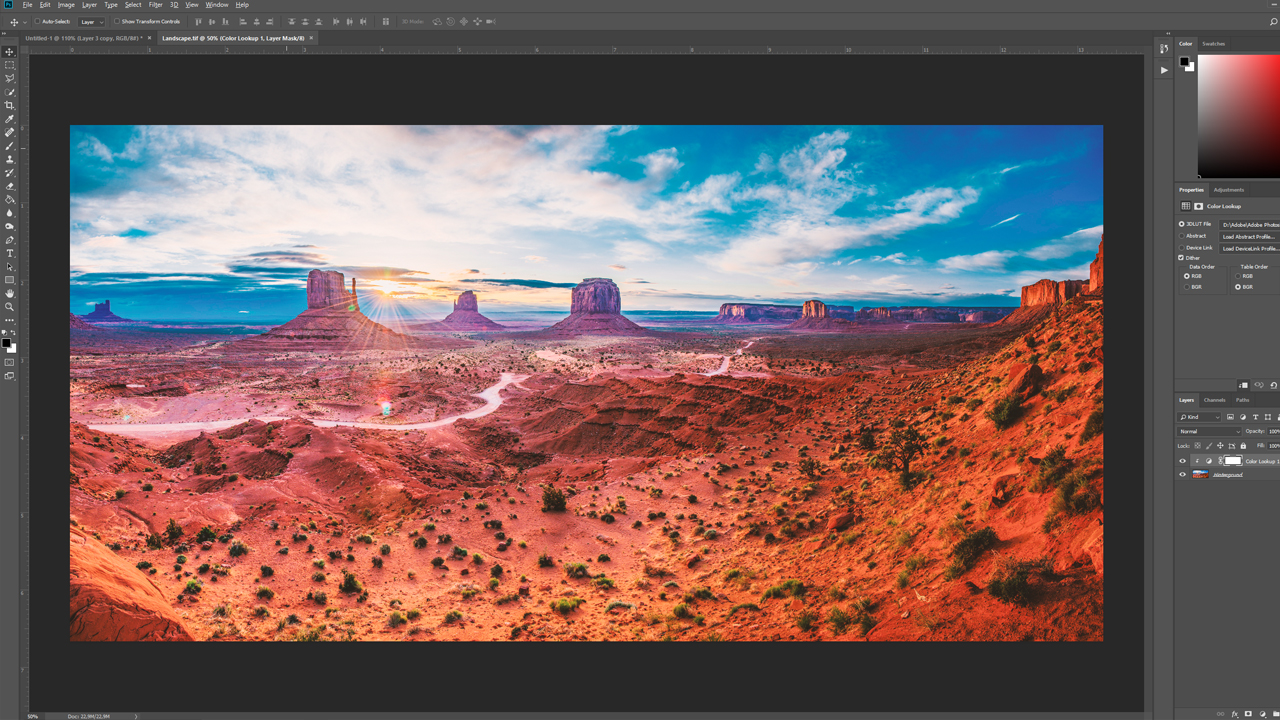
The main function of Photoshop is to provide the landscape photo in the right resolution and to convert it to CMYK mode. Define a resolution of 300 dpi (dots per inch), select the suitable colour profile via Edit > Convert to profile and subsequently optimise the colours a bit.
2) Logo design in Illustrator
![]()
The logo is created in Illustrator. Using the paths and brush types in Illustrator, you can easily add a nice effect even to lines. The logo can be scaled to the desired size without quality loss.
3) Creating artwork in InDesign
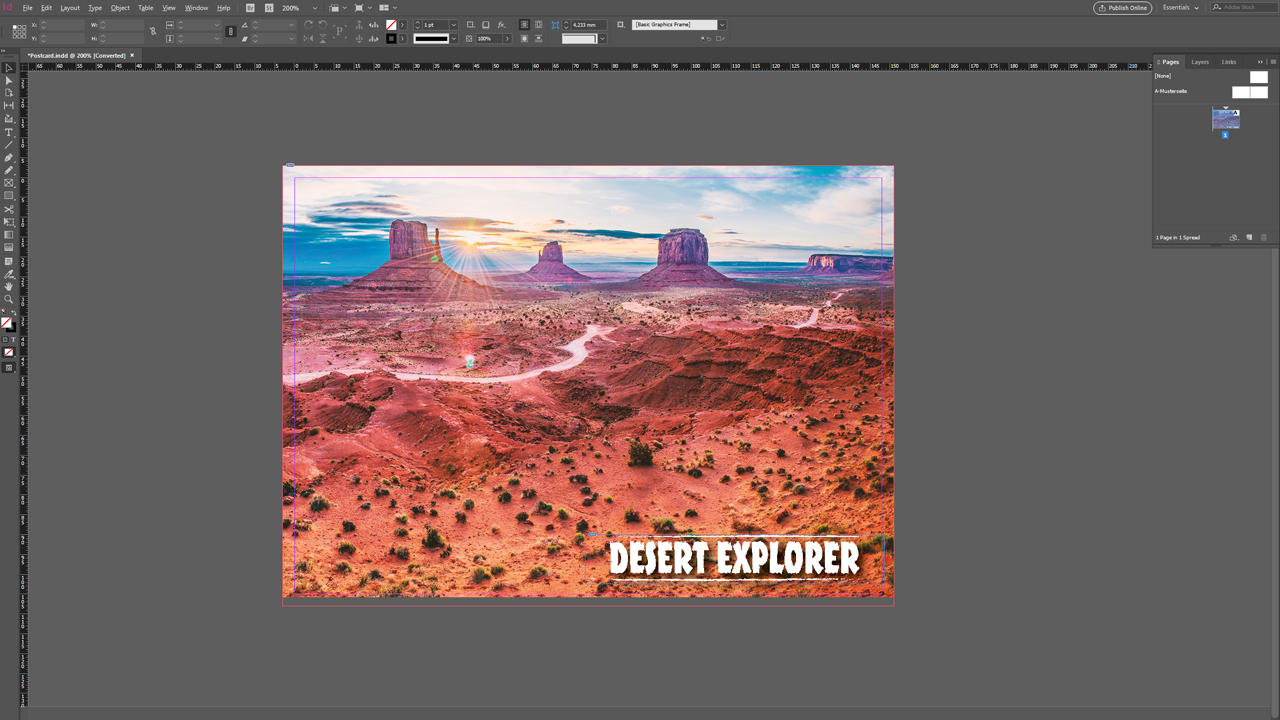
InDesign now merges the background image from Photoshop and the logo from Illustrator. We create a print-ready document with the following parameters:
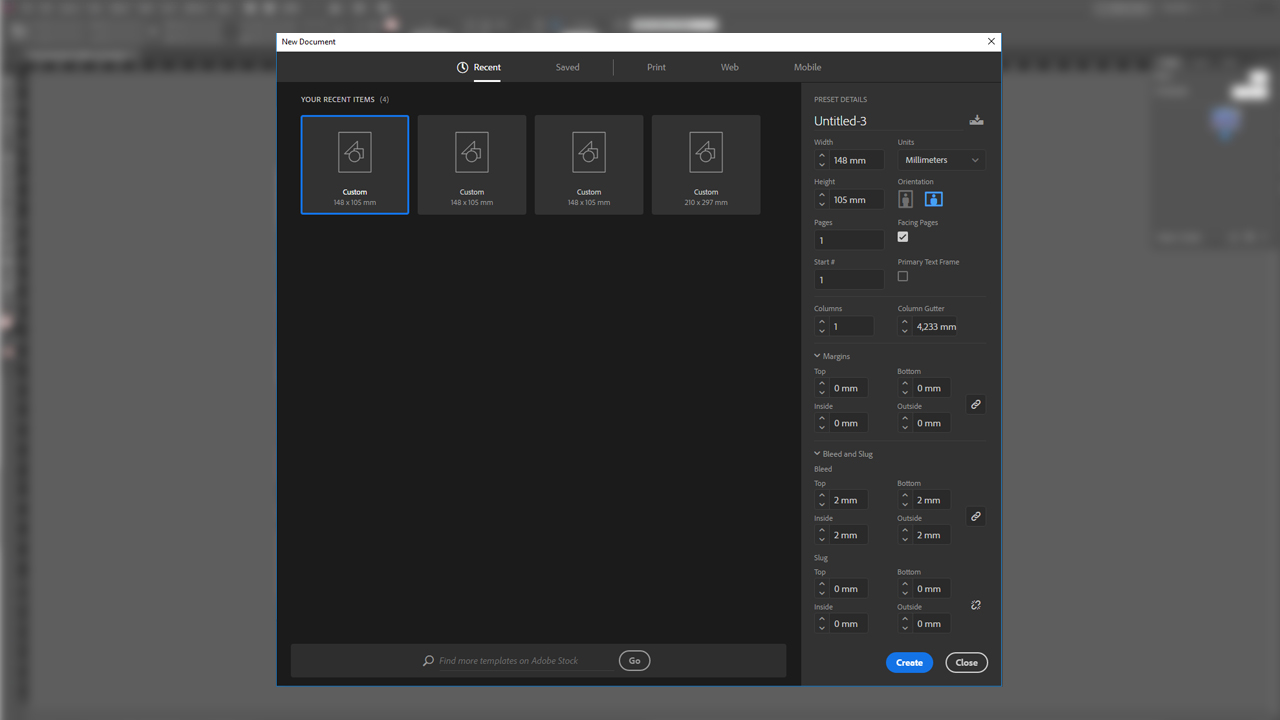
The document should be sized 148 x 105 mm with a circumferential bleed of 2 mm. Disable the Facing Pages check box.
Downloading free document templates
If you do not want to make all the settings yourself, you can also download a suitable template. Go to the corresponding product page in the online shop to download the template for your print product.
We will now position the background and the logo in the InDesign document. A drop shadow is added to the logo to enhance its visibility. The 2 mm bleed defined previously allows adjusting the background image exactly to the outer lines.
The export
- On the General tab, we choose the PDF standard PDF/X-3:2002 and compatibility from Acrobat 4 or PDF 1.3.
- The InDesign presettings under Compression can be retained in most cases. A setting of 300 dpi assures an excellent and vibrant print result provided that the original material is of a similar quality.
- For marks and bleed, you should use the bleed settings of the document if these have already been set up correctly when creating the document. Our templates have the bleed included in the size of the canvas. We do not want to output any marks and auxiliary characters!
- Go to the Output tab and to Color conversion and choose the option “Convert to destination (Preserve Numbers)” and define the colour profile adjusted to the printing substrate as the destination.
- If you are working with transparencies, choose a high resolution at Advanced for transparency reduction.
- Skip the Security tab because online print shops are unable to process PDF artwork files that are password protected.
More information on Exporting artwork from InDesign
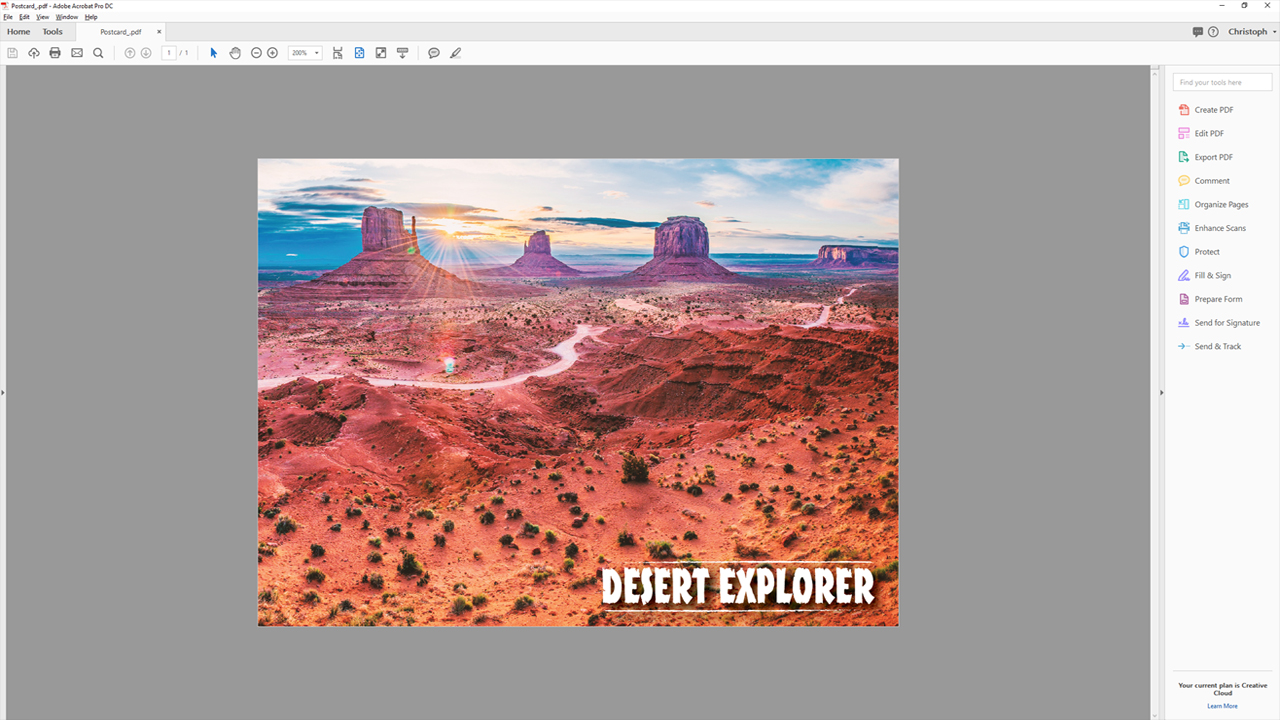
After clicking Export, the document is saved as specified. The PDF now contains all important information: The 2 mm bleed has been created, the background graphic is available in CMYK mode with sufficient resolution to produce a sharp image, the logo is vector-based and stays razor sharp even when magnified.
Result: technically perfect artwork files.
Credits:
This tutorial was created by Christoph Ullrich, media designer.
The picture in the example is from the free image database pexels.


