
Whether for sharing, archiving or printing – PDF is the most suitable exchange format for many cases. But what is the best and fastest way to create a PDF from a file?
The PDF format has been the standard format for exchanging data for years. The small file size, the independence from programs and systems as well as the same fixed layout are the most important arguments for a PDF. It is only for data that have to be changed and edited that it is not particularly well suitable.
So while there is agreement on the format for sharing, opinions differ as to how to create the PDF. The “right way” depends on which programs you have and for what purpose the PDF is to be created.
A PDF that is to be used for high-resolution printing is usually created in a different way than a PDF that is only for viewing and should have the smallest possible file size.
- For a Print PDF, the best way is to export via graphics programs from Creative Cloud, QuarkXPress and Affinity Photo. Professional PDFs can also be created with Acrobat and the Distiller.
- If you don’t need a professional document, quick and free solutions are possible by creating the PDF with online– or offline tools.
- More and more operating systems also come with a PDF printer that is sufficient for simple purposes.
The following article presents the different possibilities, shows how the solutions work in detail and gives concrete tips for creating PDFs.
Contents
Professional creation of print PDFs
Creative Cloud, QuarkXPress, Affinity Photo
If you have a professional layout or illustration program such as Adobe InDesign, Adobe Illustrator, QuarkXPress or even Serifs Affinity Publisher, you can create PDFs by exporting the data directly from the program. This route is often the fastest and in any case a professional approach, as here the specifications for the PDF are made directly during the export, and even high-end PDFs for the print shop can be created.
Procedure

The procedure is similar in all the products: Export the data, for example, with CTRL + E (InDesign) or CTRL + ALT + P (Quark). It is also possible via the menu File · Adobe PDF presets or in Illustrator with Save as · PDF format . Now look for a suitable setting, i.e. a collection of the desired export settings, and the ‘Save’ dialog is immediately loaded with the appropriate settings.
A handful of settings is supplied with the software; these include output with minimum file size [Smallest file size] or the set PDF-X:3-2002 with which a PDF-X-compatible PDF is created.
Creation of custom settings
Creating your own settings is basically a simple matter. Click Define and the following dialog box allows you to edit or delete the existing sets or to create new sets. If you want to create a set based on an existing one, first select the base set and then click New.
Importing and sharing sets
Sets can be exchanged using the commands Load or Save as. That is practical in many cases – for example, to share a set you have created yourself with a colleague who is also to write print data using the same settings in the future. It is also common to load a set that print shops give to their customers or that publishers give to their graphic designers.
Settings for the PDF
The settings to be made within the set are encountered again and again when creating a PDF. If you want to write professional data for printing, you should familiarise yourself with these settings in detail and, if in doubt, also consult your print shop. For ONLINEPRINTERS we have created the article Ctrl + E: Exporting print-ready PDFs with InDesign is which we have compiled all you need to know, so the following section gives just a brief overview.
In the category General you will find options for exporting to individual PDF documents, options for working with layers and with interactive elements. Under Compression you specify two variables: Resolution and compression and the quality settings for images. Under the tab Markers and Bleed you will find the print-relevant options for bleed and markers. The settings for the profiles can be found in the category Output and for font embedding under Advanced. The latter also contains the settings for handling transparency (as of PDF 1.4, native transparencies are possible and the flattening option is no longer offered).

Once you have created the set in an Adobe application, you can now access it from other Adobe applications when exporting or saving. The PDF is thus written quickly, and above all safely, since by summarising all the settings, the risk of inadvertent mistakes can be ruled out.
Creating PDFs with Acrobat and Distiller
Adobe Acrobat
Probably the most obvious, but not always the quickest, way to create a PDF is via Adobe Acrobat. If you work with PDF files a lot and need to make corrections to the PDF from time to time anyway, the full version of Acrobat is a good choice. It can not only create PDFs, but also convert Rotate, Crop, Merge, in JPEG or Word files and much, much more. It is only available by subscription, however, and is relatively expensive.
To convert data to PDF format, go to the menu File and then the command Open and select in the dialog at the bottom left Display · All files.
Alternatively, select File · Create in the menu to display various options – such as converting data from the clipboard or the scanner. PDF from file allows file formats to be converted in the background using the PDF Maker. Depending on the selected format, the respective programs are opened in the background; for EPS and PS data, for example, the Distiller. With File · Create · Create several PDF files you can selected several files from different folders and manage them in a list. The list of file formats to be converted is long, but errors can frequently occur when opening certain file formats. In such cases you should choose another way of converting.
In the dialog you have to select Display All files in order for the files to be displayed for selection:

Several files from different folders can be selected and converted in one step:

If you have several individual files that you want to merge into a single PDF, there is a command for this, too. With File · Create · Merge files into a single PDF document you can select multiple files to be converted and then convert them into one PDF.

Tip
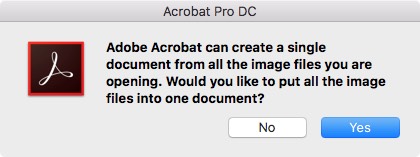
By the way, merging also works quite easily via drag-and-drop, at least if the files are located together and can be dragged onto the Acrobat icon together. If, for example, you want to merge a few images from your folder for presentation in a PDF, activate the images and drag them onto the Acrobat program icon. The program then asks whether you want to merge all the files into one PDF. You select ‘Yes’ and receive a PDF with several pages. This naturally also works with different file formats as long as they can be converted to PDF without problems.
Acrobat Distiller
The Distiller as an independent program component of the full version of Adobe Acrobat has lost significance in recent years, as the PDF documents used in the professional field As described above are generally created from within the application. Ctrl + E – end of the matter (Normally at least). Depending on the layout software, however, the Distiller allows additional settings to be made for security, the fonts and the type of conversion.
Settings
For the conversion, the Distiller uses a collection of settings that are created and defined in the Adobe products as “Adobe PDF settings”, the ‘settings’ already mentioned above. These include the handling of colour profiles, the compression of image data or the embedding of fonts. The Distiller automatically lists settings that have already been made and installed on the computer.

Monitoring of PostScript files
In addition, the user can monitor PostScript files that are to be converted via the Distiller in a kind of queue. If you actually work frequently with PostScript files and need to convert them to PDF format, you can let Distiller and its up to 100 monitored folders help you, If Distiller finds a PostScript file in a monitored folder, it automatically converts it to PDF in the background and moves it to an output folder according to the settings. You can assign specific conversion and security settings to the monitored folder. These can include, for example, the scanning interval and the handling of the PostScript file after conversion.
Creating PDFs with on-board tools
Windows
The Windows operating system also has an integrated PDF printer that allows you to create a PDF from any application. Open the print dialog and in the drop-down menu select Printer Microsoft Print to PDF. There are a few more settings that can be made, but these relate only to the page numbers and size, but not to the quality or the handling of the fonts.
If you need more functions, such as for protecting PDFs, you used to be able to buy a corresponding extension in the Microsoft Store. This obviously had quality issues, however, and is no longer available.
MS Office
If you are using an older Windows version, you may still be able to create a PDF using on-board tools: Many of the applications in the Microsoft Office Suite have supported PDF export since version 2010. Here you select in the menu File the item Save as or alternatively Export and then the PDF format.
However, true of both variants – both Windows and Office – is that: These methods are OK for quickly creating a PDF, but they should preferably not be used to create print data.
Mac
PDFs are basically no problem for the Macintosh operating system. As part of the Quartz graphics system with which the 2D rendering is generated, the PDF is part of the Mac OS, so to speak. That is one of the reasons why Mac OS’ own power program “Preview” is so good at understanding PDFs.
Thanks to the Quartz engine, users of the Mac OS are able to create a PDF from any application using the print menu. In the print dialog, click on the PDF drop-down menu at the bottom left and select the command Save as PDF.

Preview
Our recommendation for the Mac user: the “Preview” software. It opens a wide variety of different file formats and exports them, if required, as PDF using the command File · Export as PDF.
If you want to have more control over your PDF files, select the command File · Export and then under FormatPDF. Then directly below this box you can select the desired Quartz filter with which the PDF is to be generated.
ColorSync
If you want to use other, self-generated filters, open the ColorSync utility can click Filter. Here you will find the filters supplied by the system, but they cannot be changed. To create a new filter, click the small triangle on the right edge of a basic filter and select the command Duplicate. You can now rename the new filter and make the desired settings for image size and compression. When you close ColorSync, the new filters automatically appear also in Preview.
Important: If umlauts are used in the filter name, the new filter is either not saved at all or is saved under the name “xxx copy”.

The system filter Reduce File Size can be used to create small PDFs, but the quality is not particularly good. These should not be used for printing. Instead you should create your own filter with the following settings:

This makes it easy to shrink large PDFs for display without sacrificing too much quality.

Pro Tip
You can open a PDF directly in ColorSync and watch live how the data change, depending on the filter settings. Display both windows with File · Open for the PDF, and with File · New window for the filters. (The PDF is already reduced when you open it, but you still get an impression of the effect of the filter settings.) In the window with the PDF, select the command Live update from the filter information from the drop-down menu on the bottom left. If you now click on the desired filter in the category Filters, the PDF will be displayed with this filter. If you change values in your own filter in this way, you will again get a live preview in the PDF.
Linux
With Linux it depends on the used distribution as to how comfortably users can create a PDF. With the popular Ubuntu, this is quite easy: Users can create PDFs there via an integrated function. To do this, select in a document under File · Print the option Print to file. This doesn’t work from all programs, but at least from the most important ones. If you need more applications, you can install the PDF printer CUPS-PDF.
As with Windows, there are other ways to create PDFs, namely directly from an application. Some programs, such as Scribus or the office program LibreOffice, offer a corresponding export function.
With other distributions, you may have to install a PDF tool separately. Among the best known are Ghostscript, Okular or the PDF printer CUPS-PDF mentioned above.
Creating PDFs with online tools
If you want to create PDFs with an online service, you have a wide choice of free providers that are more or less comfortable to use.
Please keep in mind, however, that you have to upload your file to the provider’s server before it is converted. So if you have sensitive data to convert, you’d better choose another method.
PDFfiller
PDFfiller offers a freely available PDF Converter and is at the same time also an online editor for PDFs, but against payment. So if you only want to convert files, this is not the best solution for you. Some formats such as EPS or AI cannot be converted, as is the case with most providers.

Smallpdf
The provider Smallpdf converts various formats, but you have to choose the right converter from the very beginning. Here there is the Microsoft converter for Word, PowerPoint and Excel or the Converters for pixel formats such as JPEGs, PNGs or TIFFs. If desired, the converter can also access your Google Drive or Dropbox directly. If you upload multiple files at once, these are also packaged into a multi-page PDF.
PDF24
PDF24 appears somewhat outdated at first sight, but offers extensive techniques and Converts even formats that are rejected by other providers, such as the SVG format.

Soda PDF and online2pdf
Soda PDF and online2pdf also do their job, but like almost all providers convert only a limited range of formats.
PDF Converter
The online service PDF Converter is is one of the few exceptions that can create a PDF even from EPS data. If you want to create more than one document per hour, however, you’ll have to switch to the paid subscription – but at five dollars a month or a one-time payment of USD 99 for unlimited access, that’s not an unreasonable cost.
Creating PDFs with offline tools
If, for security reasons, you want to have the conversion carried out by an additional software tool on your local computer and not by an online service, Windows gives you better options than a Mac because the choice is far larger here. If none of the applications described above for creating PDFs are installed, and you are not running Windows 10, we recommend one of the following free programs.
PDF-Creator für Windows
With the PDF Creator, the PDF is created via the print dialog. In the next dialog, documents can be merged and other settings can be made.
Foxit Reader for Mac, Windows und Linux
The Foxit Reader also offers a virtual printer with which the PDF can be printed from the native application. If Foxit Reader is installed, the user can also create a PDF via the context-sensitive menu and the command Convert to PDF with Foxit Reader.
 Our recommendation for Windows
While Mac users can only use the PDF24 service online, Windows users can download the PDF24 software. The PDF24 Creator is free and can convert a very wide range of formats into a PDF. That’s a clear recommendation from us here!
Conclusion: There are good possibilities
For professional application and when high-resolution printable data have to be written, exporting from layout and graphics programs is recommended.
For pure viewing files that may also have come from applications other than the CS programs, Mac users are well served either with Acrobat or – if not available – always with the “Preview” software.
Windows users will find good possibilities for quickly creating PDFs using the PDF24 offline tool or via the ‘Print’ option.
Photo credits:
- Screenshots of the processing from the Adobe programs Acrobat, Distiller, InDesign and the Apple programs Preview and ColorSync
- Further screenshots from PDFfiller and PDF24
- Source: VectorKnight via Shutterstock


