
Users can choose from an almost infinite variety of fonts: whether the Arial typeface included with Microsoft Windows or the popular Helvetica font to implement your print projects. To make sure that the text in your artwork prints exactly as it looks in the original document, the fonts have to be embedded. In this tutorial, you will learn why embedding fonts is important and how to do this.
Contents of this article:
- Why should I “embed fonts”?
- What happens when embedding fonts?
- Exporting fonts from InDesign
- Checking if fonts are embedded
- Converting fonts to outlines
- Summary: The correct workflow in InDesign
- Embedding fonts with Photoshop and Illustrator
Why should I embed fonts?
You probably have a wide variety of fonts installed on your computer such as the classic Helvetica typeface or decorative cursive fonts for any occasion. And you have surely encountered the following problem also in programs such as Word or PowerPoint: You invest a great deal of time and effort into creating a proper and visually appealing document. But after sending the document, e.g., to a colleague, everything in your document suddenly looks totally different because the fonts have been substituted automatically. A similar effect can occur in artwork documents where fonts are not embedded. When creating artwork, you usually pick a font for your project, position the text in this font in your document and finally export the finished project as a PDF. When you upload your artwork PDF file to a print shop, the latter might not have the same fonts that you used. As a result, the artwork may print incorrectly.
Onlineprinters has a huge collection of different fonts. When we receive artwork where fonts are not embedded, we try to embed the fonts automatically. If we don’t find the fonts used in our database and are therefore unable to embed them, we will contact you. To avoid delays and make sure your order is processed smoothly, you can embed the fonts before uploading the print-ready files when exporting the artwork from programs such as InDesign.
What happens when embedding fonts?
Basically, embedding fonts ensures that all the font information used for your document is stored in the PDF file. So the font is locally available on the print shop’s computer for the time that the document is opened. Embedding increases the size of your artwork file only slightly but allows all fonts to be displayed correctly.
Exporting fonts from InDesign
InDesign will automatically embed all fonts when exporting the file provided that this is permitted by the vendor’s licensing conditions. To make sure that all fonts are included when exporting your artwork as PDF, go to the Advanced tab in the Export window of InDesign.
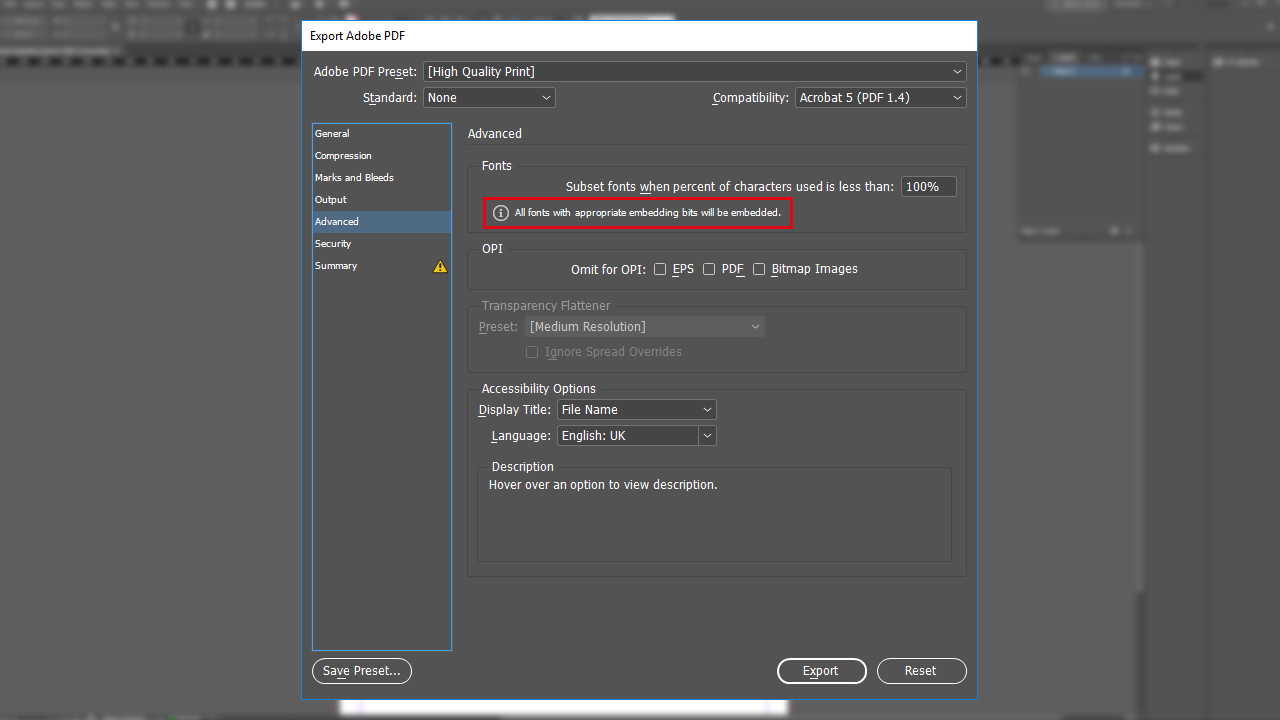
This window displays the notice “Only fonts with appropriate permission bits will be embedded”. This means that all characters of the corresponding font that have been used will be stored in the file during export.
Check font embedding
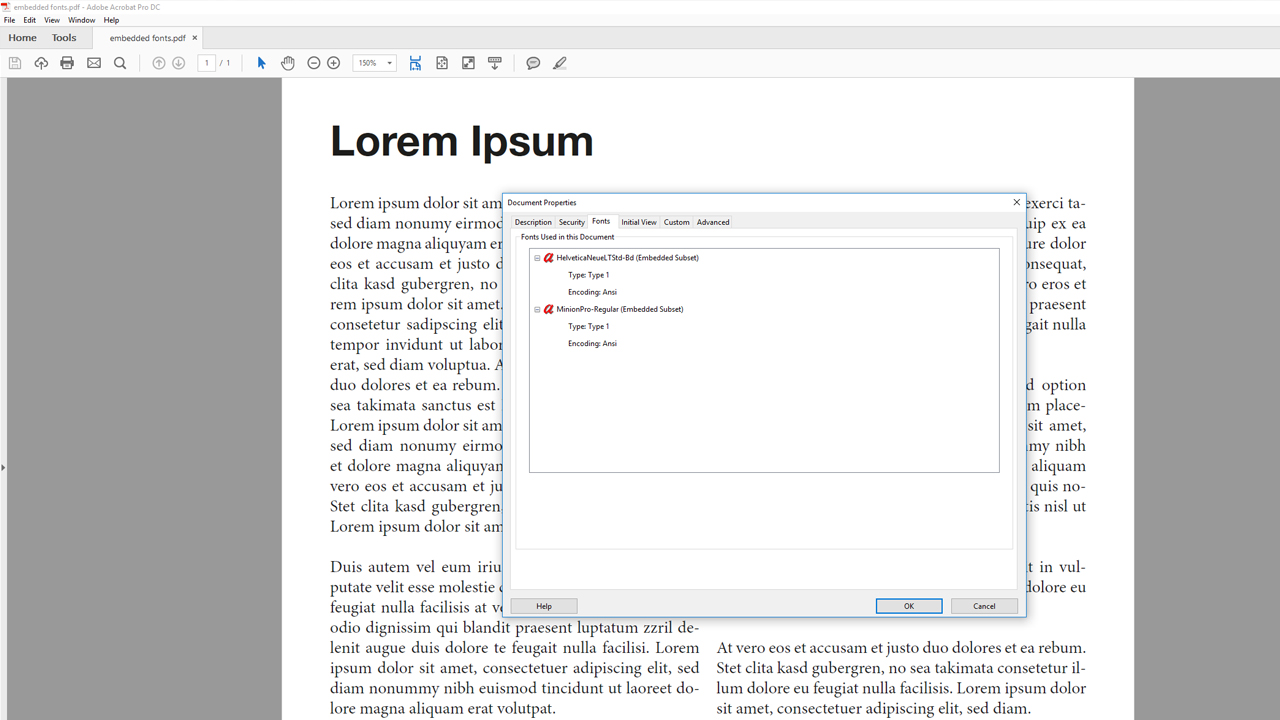
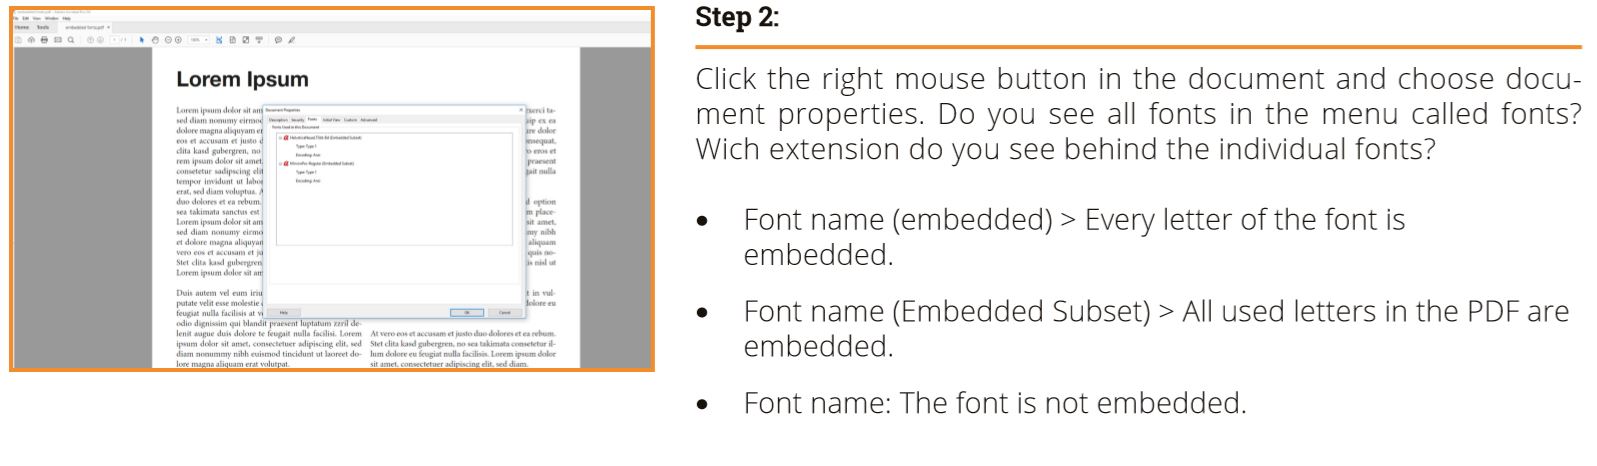
If fonts were not exported correctly, Adobe will substitute them with standard fonts in the PDF document. In some cases, this is immediately evident, in others not. To check whether all desired fonts have been exported correctly, you can review the font export settings in Adobe Acrobat. To do so, right-click in the open document and select Document properties in the context menu. A window with different tabs opens where you can review the export settings. The Fonts tab shows a list of all fonts in your document.
The information after the font is important:
- Name of font (embedded): The font is fully embedded.
- Name of font (embedded subset): The font is partially embedded.
- Name of font: The font is not embedded.
A fully embedded font has the complete character set embedded whereas a partially embedded font only has the characters embedded which are actually used in the PDF. Partially embedded fonts in an artwork PDF file can also be processed by the print shop. In our example, two fonts are partially embedded: one font that was used for the heading and one font for the body text.
Converting fonts to outlines
If it is impossible to embed a font or if it is displayed incorrectly in the PDF despite being embedded, you have to convert the type to outlines. Display errors in the PDF may occur, e.g., because the originator of a font type did not exactly follow typographic specifications. Although the type looks good, it cannot be processed correctly. Programs such as Adobe Acrobat try to correct such errors or recalculate which exacerbates the problem in most cases. As a result, minor pixel errors occur or elements of very cursive fonts are missing. Take a look at the PDF to see whether this is the case. Zoom in on the heading for this purpose using the magnifying glass or alternatively the shortcut CTRL & +/-. Check for font errors using a high zoom factor. Repeat this check for all other text parts.
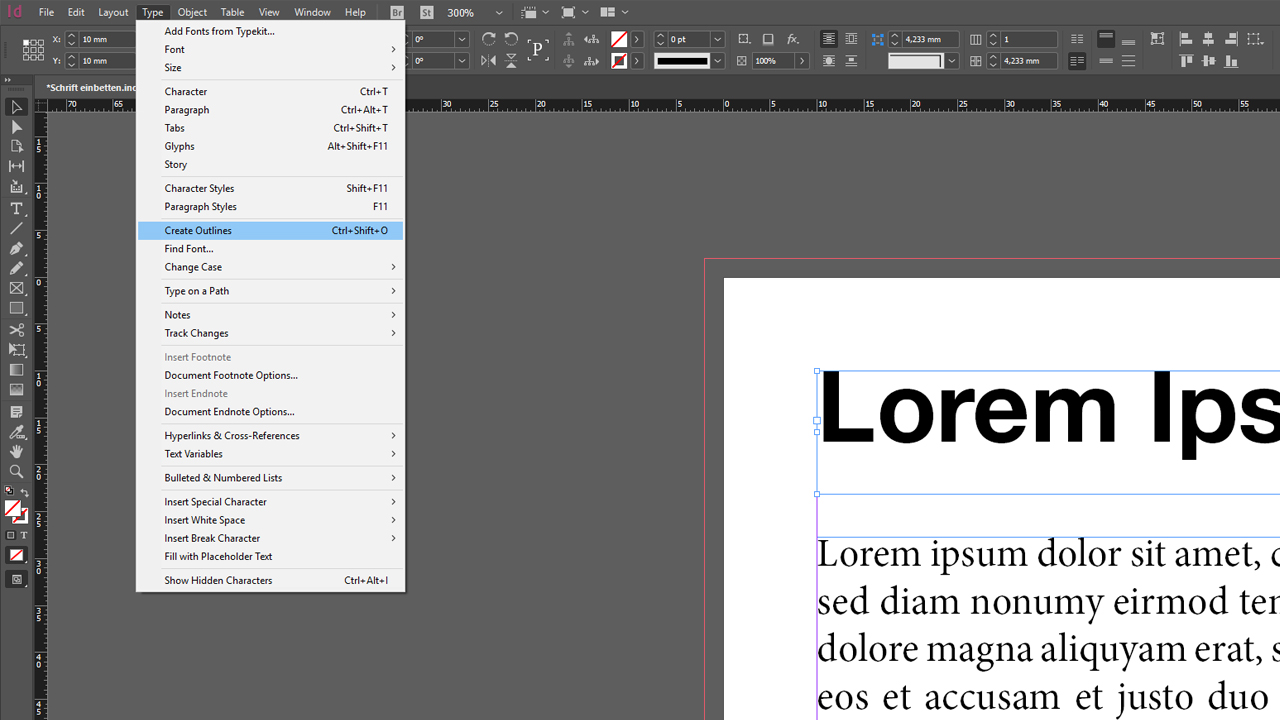
By converting type to outlines, InDesign allows you to bypass potential display or embedding problems. So instead of having to recognize the existing font, Adobe Acrobat only shows the coloured outline.
To convert type to outlines in InDesign, select the corresponding text frame and click Create outlines.
Please note that converting type to outlines will degrade the typographic quality of the text and make outlined type look thicker. This is true especially for small point sizes and delicate fonts. This is because the font has been converted to vector format. You can move and scale the text without quality loss, but you will no longer be able to edit it. Therefore, converting type to outlines should be one of the very last steps in your workflow. After exporting the artwork, the font should be displayed in the PDF without errors.
Summary: The correct workflow in InDesign
To prevent undesirable surprises, follow these three steps when integrating fonts into your artwork document in InDesign:
Step 1: Create the InDesign project
Position your text in any font and point size on your print project. Standard fonts such as Arial, Helvetica, Futura or Frutiger will always be exported without problems. When using fonts downloaded from the internet, you should check whether the export has been successful.
Step 2: Export from InDesign
To export your finished print project, click File > Export. The Advanced panel of the export window shows the notice “Only fonts with appropriate permission bits will be embedded”. This means that all characters and fonts used will be saved in the document when exporting it.
Step 3: Check the exported PDF artwork file
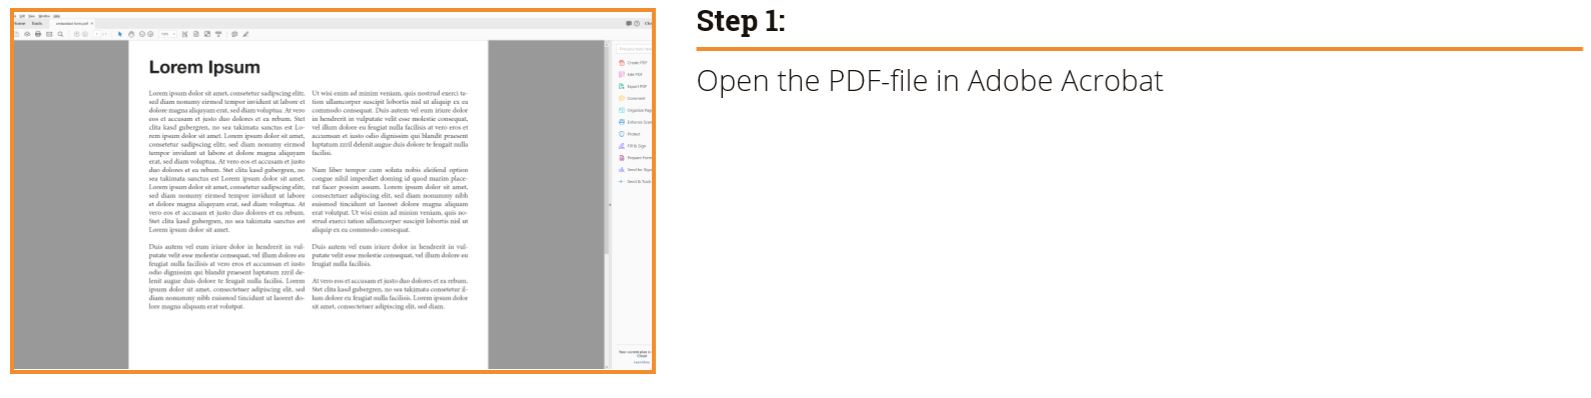
In the last step, check the PDF for display errors by examining text on a random basis. Also check the font information shown in the export settings:
If a font is not embedded, it has to be converted to outlines in the InDesign document:

Download infographic
Download the step-by-step instruction on “Checking exported PDF artwork & embedding fonts” as infographic.Download
Embedding fonts with Photoshop and Illustrator
InDesign is the best choice to process fonts and text. You can also use the graphics editors Photoshop and Illustrator to generate PDFs with embedded font. However, there are some things you should pay attention to in this context.
Photoshop
Photoshop is a pixel-based graphics program. Its font embedding capabilities are limited. However, there are two ways of embedding fonts in Photoshop: You can either position the font and keep the text layer or rasterize the text. When choosing the latter, you can no longer apply graphics effects to the the text or edit its characters. We generally recommend the first option. When you export your document with the existing text layer, Photoshop will embed the fonts into the PDF document. If you choose to rasterize the text, the font will be fully converted to a pixel graphic and you will no longer be able to edit it as a text layer. When exporting your project to a PDF file, there is no embedded font in the document. This becomes evident when zooming in on the PDF. You can see the rasterization (jagged edges) at the outlines of the font. How pronounced the jagged effect is depends on the size of the font and the resolution of the document. This effect is only visible when using a high zoom factor and very big point sizes in a document with 300 dpi resolution.
To create a PDF from Photoshop, click File > Save as and choose Photoshop PDF as the file format. Compared to InDesign or Illustrator, the export window of Photoshop only contains a limited set of setting options.
Illustrator
Being a vector-based graphics program, Illustrator is better suited to export PDFs. Once you position text into your document, Illustrator will consider it as text layer and embed the type accordingly during the export. The saving process is identical to InDesign. Illustrator also allows you to convert text to outlines. We only recommend this step if you are unable to embed the font type, e.g., due to licensing restrictions. Select the text and click Object > Transform. The text frame is dissolved and the type is converted to outlines. The process was successful if the blue text frame around the entire text has disappeared and each single letter is outlined instead. The text can no longer be edited now.
To create a PDF from Illustrator, click File > Save as and choose PDF as the file format. The export window opens with the Advanced panel which is identical to its counterpart in InDesign. Here you can review whether the text is actually embedded in the PDF when exporting the document.
Credits:
By media designer Christoph Ullrich.

